Tester
Mautic is always looking out for people to help with testing and reviewing all new features and bug fixes in Mautic before including them in a release. Even if you can spare an hour or two a week, it significantly increases the number of bugs and features that reach Mautic users.
There are two ways to set up your testing environment:
On your local machine with DDEV - recommended
On GitHub Codespaces
Once your testing environment is ready, testing bugs and features is very quick and easy.
Setting up a local testing environment
Prerequisites
Before starting, you need to register for an account at GitHub if you don’t already have one. You also need to install these on your machine:
Visual Studio Code - recommended - or your preferred IDE
A Docker provider*
Note
* Please read the “Docker Installation” section on the DDEV official website to learn which Docker provider is suitable for your operating system.
Forking the repository
Forking the mautic repository is the first step you need to take before proceeding. Forking means making a copy of a repository to your GitHub account.
To fork the repository:
Go to Mautic GitHub repository.
Click the Fork button at the top.

Select your username in the Owner * dropdown menu.
Warning
Don’t select an organization here. Always choose your personal account.
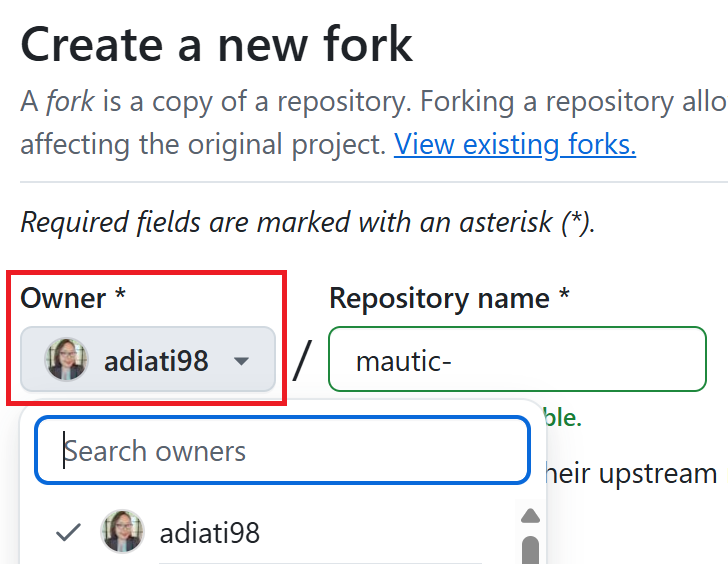
Deselect the Copy the DEFAULT-BRANCH-NAME branch only checkbox so you can clone multiple base branches.
Click the green Create fork button at the bottom.

Cloning the repository
After you forked the repository, you need to clone it. Cloning means copying a repository to your local environment. In this case, you want to clone your forked repository.
Note
The Mautic GitHub repository contains multiple branches that represent specific release versions of Mautic. You should clone the branch that you need to test into its own dedicated folder.
For example, when you need to test Mautic versions 6 and 7, clone the branch 6.0 and save it in a folder. Then, clone the branch 7.x and save it in a separate folder. You can name the folder anything you want, but it’s best to reflect the branch name. For example, use names like mautic6, mautic7, and so on.
Follow the steps below to clone your forked repository:
Click your avatar on the top right.
Click Repositories.
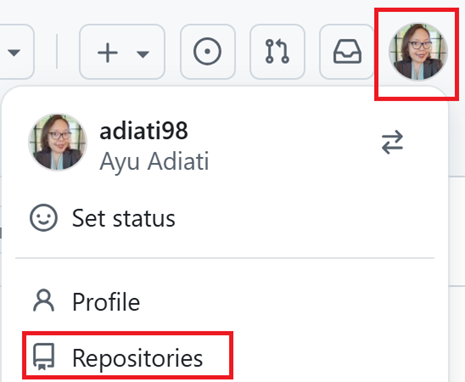
Open your forked repository. The URL should have your username. For example:
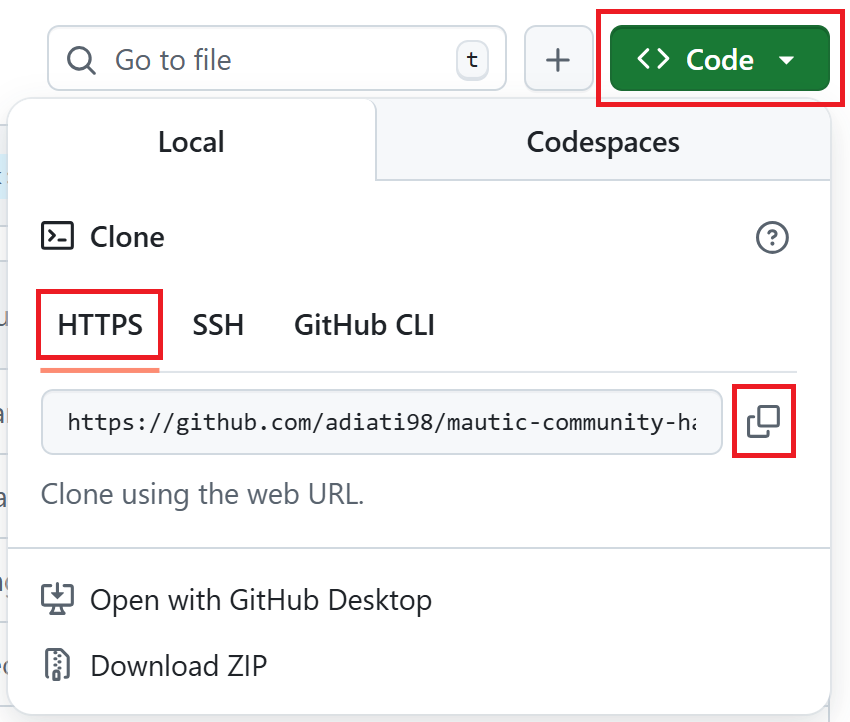
https://github.com/YOUR-GITHUB-USERNAME/mautic.git.Click the green Code button on top.
Select HTTPS and copy the URL.
In your terminal, go to your local directory where you want to save the project.
Run the
git clonecommand specifying the branch you need to test and a folder name to save it, then hit Enter:git clone --branch BRANCH-NAME https://github.com/YOUR-GITHUB-USERNAME/mautic.git FOLDER-NAME
Here are some examples:
git clone --branch 5.2 https://github.com/YOUR-GITHUB-USERNAME/mautic.git mautic5
git clone --branch 6.0 https://github.com/YOUR-GITHUB-USERNAME/mautic.git mautic6
git clone --branch 7.x https://github.com/YOUR-GITHUB-USERNAME/mautic.git mautic7
Note
DDEV uses the folder name as the project name, so later on, this automatically gives you clean URLs like:
https://mautic5.ddev.sitehttps://mautic6.ddev.sitehttps://mautic7.ddev.site
Setting up a local DDEV instance
Now that you have the repository’s branch that you need to test locally, it’s time to set up a local DDEV instance so you can use PHP, MySQL, and all the other components that Mautic requires to run.
Move into the directory using the command, where
Xis the version of Mautic that you saved in yourmauticfolder:cd mauticX
For example:
cd mautic7
Start the DDEV environment with this command:
ddev startThe first time you run this command, it might take a little while to run through the process.
If prompted to install Mautic, choose Yes.
It installs all the dependencies that Mautic requires to run.
Live preview the Mautic instance
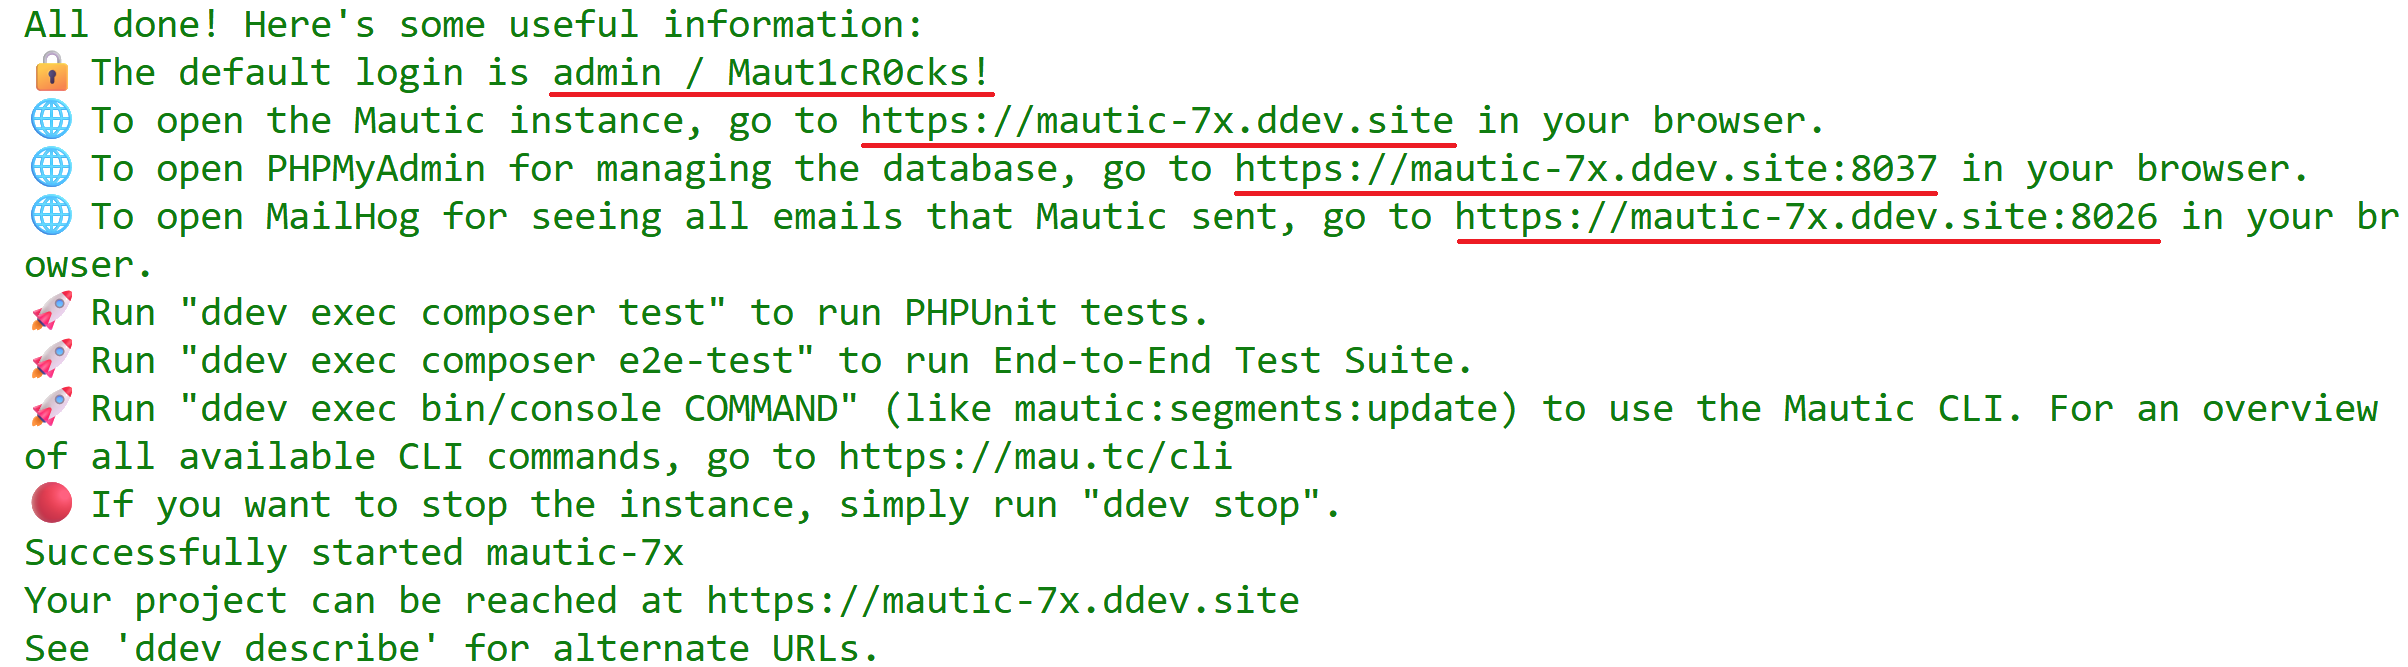
Once the installation process finishes, it displays the URL for the Mautic instance, as well as the URLs for Mailpit and PHPMyAdmin, in case you need to test outgoing emails or database operations. It also provides the default login credentials.
Follow the steps below to open the Mautic instance:
Hover over the link to the URL of the Mautic instance.
Open the link in the browser by pressing
Alt + click.Log in to Mautic. See the tip below to log in to Mautic.
Tip
The default username to login to Mautic is always
admin, and the password isMaut1cR0cks!.If you’re testing an older version of Mautic than
5.1, use the passwordmautic.
Now that you’ve set up your local environment, go to the “Testing a PR” section to start testing a PR.
Setting up a testing environment on GitHub Codespaces
To get the best experience, work locally whenever possible. However, if that’s not possible, you can use GitHub Codespaces.
GitHub Codespaces lets you spin up a Mautic instance in the cloud with a PR applied. The Mautic instance also includes a mail-catching tool, Mailpit, and PHPMyAdmin, which allows viewing database tables. While you can’t test some PRs this way, such as when testing the installation process, the vast majority can.
Setting up a codespace
Go to Mautic GitHub repository.
Open the PR that you need to test.
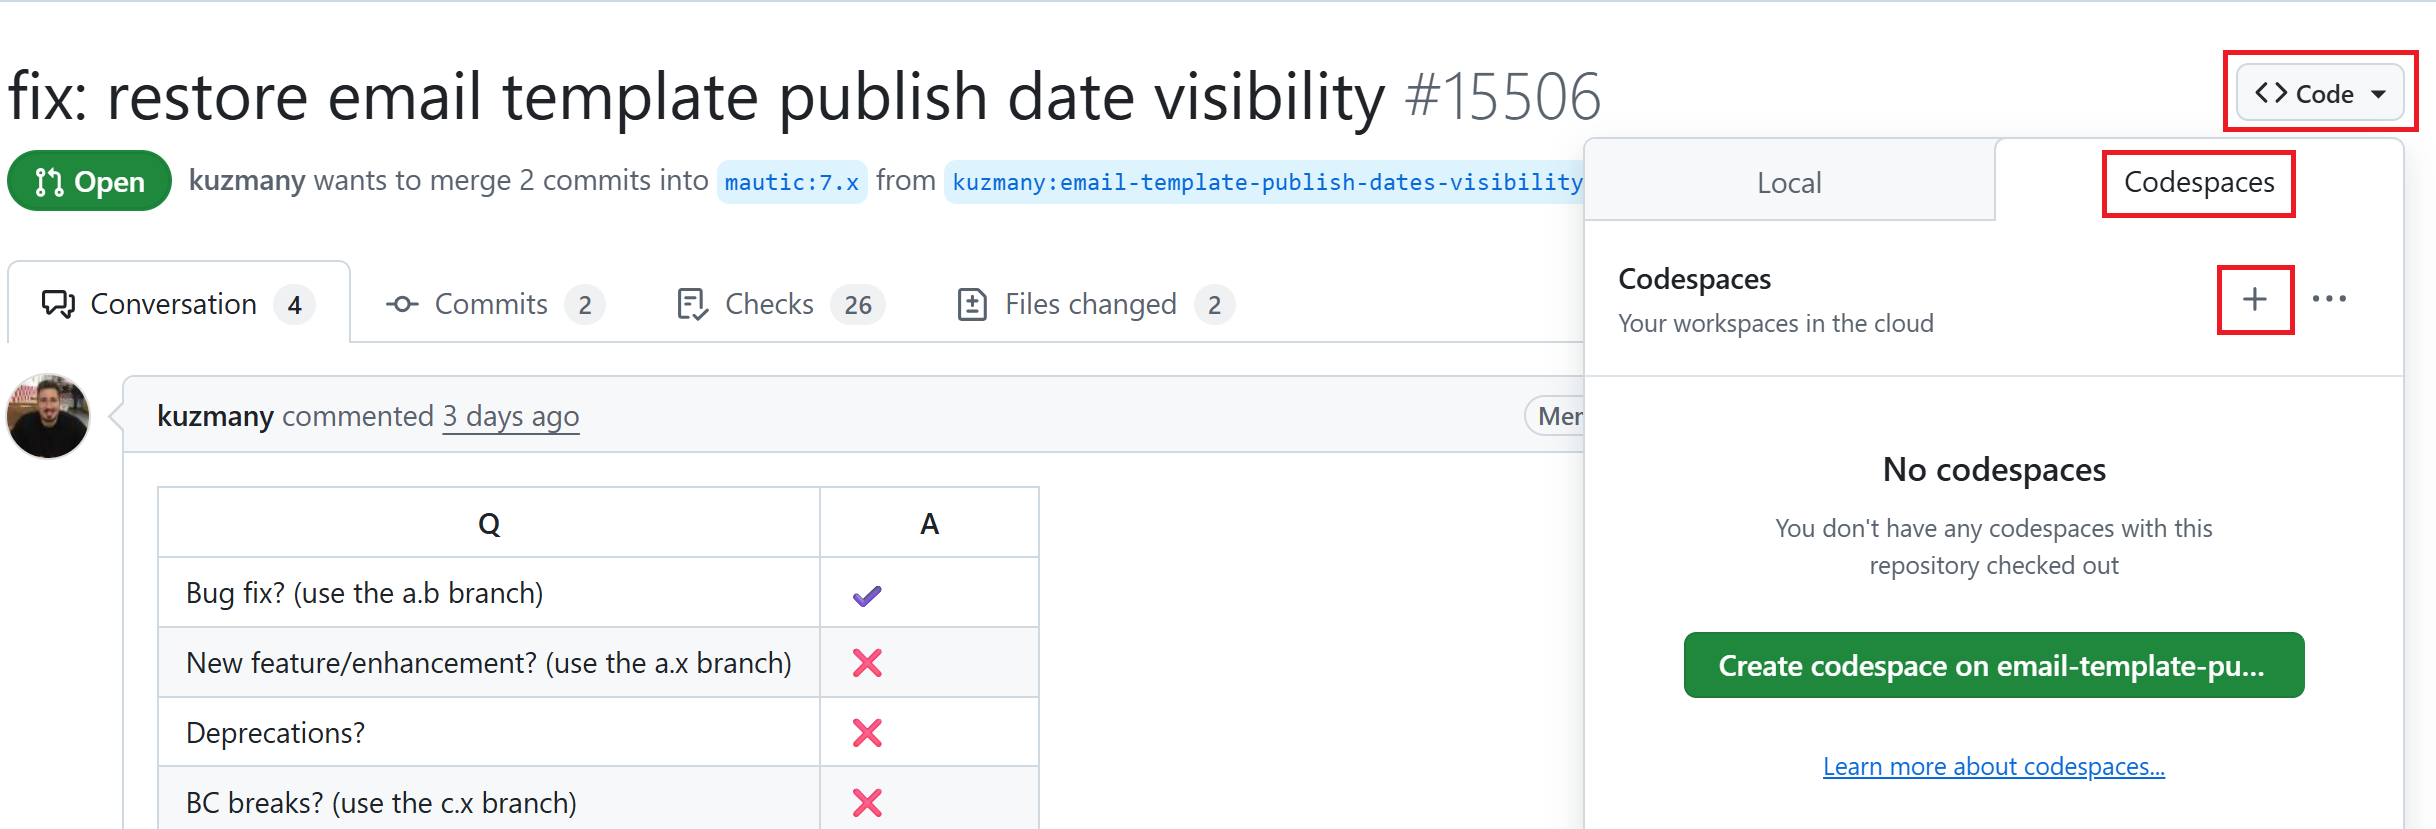
Click the Code button in the top-right corner, next to the PR title.
Click the Codespaces tab.
Click the green Create codespace on BRANCH-NAME or + sign to create a codespace.
Wait until the codespace finishes building and the
postCreateCommandfinishes its task, as shown in the screenshot below. Please be patient, as it may take some time.
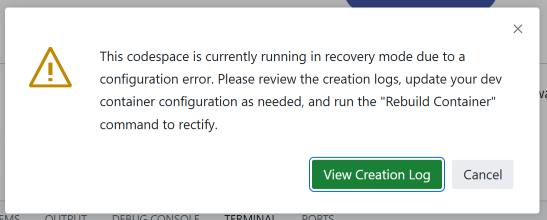
Note
If you get a warning that the codespace is currently running in recovery mode due to a configuration error, as in the following screenshot, follow the instructions in the “Rebuild a codespace” section.
Run
ddev startto install Mautic and its dependencies.Type Y and press Enter when you get prompted to
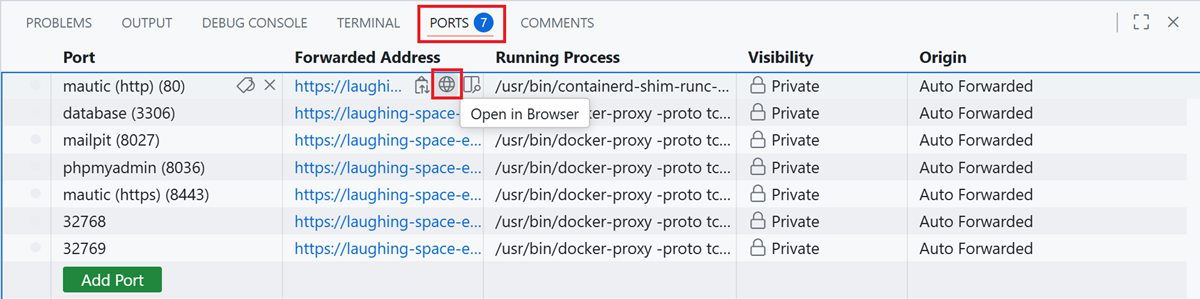
Permission to beam up? [Y/n] (yes):. Please wait until the process is complete, which may take a few minutes.Click the Ports tab.
Find the port that you need to open.
Hover over the Forwarded Address tab, right next to the port.
Click the globe icon to open the port in the browser.
Log in to Mautic. See the tip below to log in to Mautic.
Tip
The default username to login to Mautic is always
admin, and the password isMaut1cR0cks!.If you’re testing an older version of Mautic than
5.1, use the passwordmautic.You can run the
ddev describecommand to see the list and details of available URLs and ports.
After you set up the environment, you can follow the test instructions in the PR and leave a PR review.
Rebuild a codespace
Follow these steps to rebuild your codespace:
Press
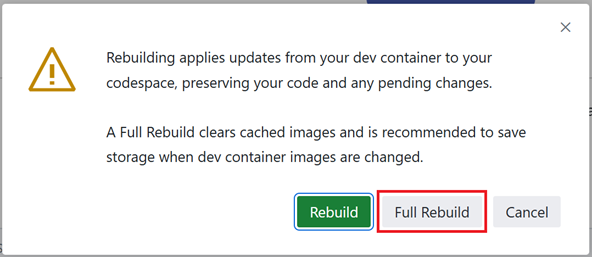
Cmd/Ctrl + Shift + P. It opens a search bar on top.Search for ‘Codespaces: Rebuild Container’, select it, and click it.

Click the Full Rebuild button.
Follow the instructions starting from step 6 in the “Setting up a codespace” section.
Now that you’ve set up the codespace, go to the “Testing a PR” section to start testing a PR.
Testing a PR
When testing a PR, you may evaluate either a new feature or a bug fix.
If you’re testing a bug fix, navigate to the “Reproducing a bug” section. For new feature testing, proceed to the “Testing the PR” section.
Note
Mautic maintains Open Source Fridays board, which shows you a list of all of the bugs and features that need to get tested.
Reproducing a bug
The first step when testing a PR is to reproduce the bug and ensure you experience the same problem the developer is trying to fix.
First, you need to update the base branch in your forked repository:
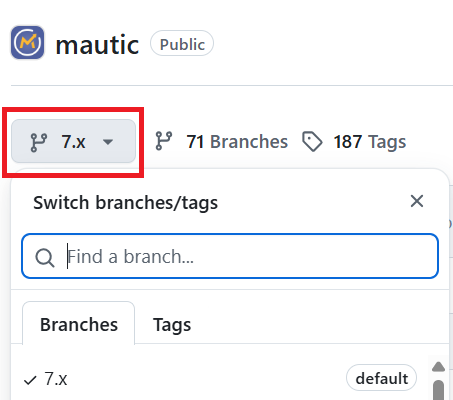
Go to your forked repository:
https://github.com/YOUR-GITHUB-USERNAME/mautic.Click the branch dropdown menu on the top left.
Select the branch where you need to reproduce the bug from.
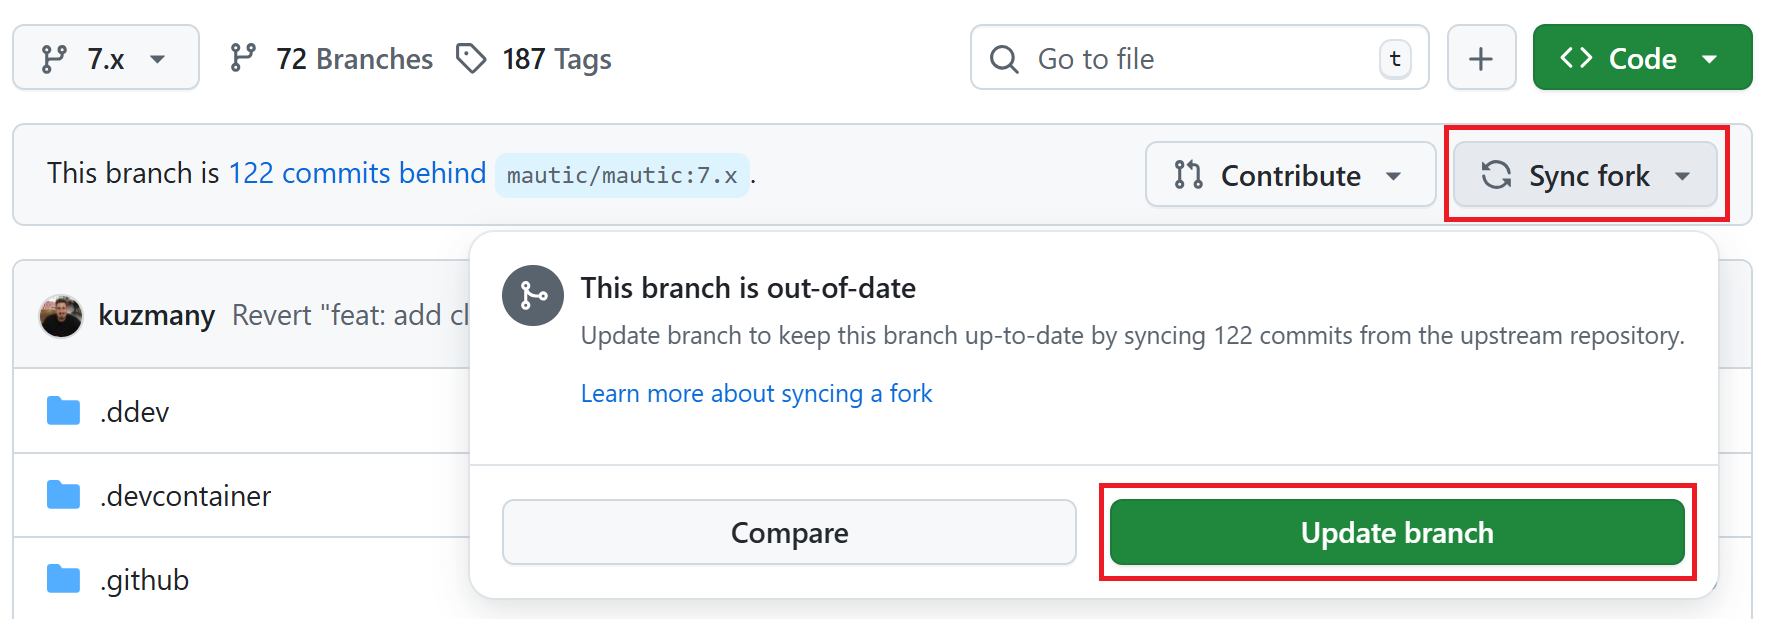
Click the Sync fork button on the top right to ensure that the branch in your forked repository is up to date.
If your branch is up to date, it shows “This branch isn’t behind the upstream
mautic/BRANCH-NAME” message.However, if you need to update your branch, click the green Update branch button.
Then, follow the instructions below, depending on your testing environment.
Local environments
Open the branch folder that you need to test in your code editor.
Run
git statusto ensure you’re on the correct branch.If you’re not on the correct branch, run
git switch BRANCH-NAMEto switch the branch.Here are some examples:
git switch 5.2
git switch 6.0
git switch 7.x
Run the following command to fetch new changes from your forked repository:
git pull
GitHub Codespaces
Click the green Code button at the top right.
Follow the instructions starting from step 4 in the “Setting up a codespace” section.
Then, find all instructions to reproduce the bug in the PR description. You may need to refer to the issue report for the bug to find instructions for reproducing it.
If you don’t understand the bug or can’t reproduce it, please leave a comment so the developer can provide further information.
Testing the PR
If you’re evaluating a new feature or have confirmed a bug, you can begin testing the PR:
Follow the test instructions in the PR
Ensure you test thoroughly
Consider all potential impacts of the changes
Leave a PR review explaining what you have tested
But first, you need to have the PR in your environment.
Local environments
In your terminal, ensure you’re in the same base branch as the PR. Remember, the PR should target the Mautic release branch reported in the issue. You can see the base branch right under the PR title.

Open the PR on GitHub and click the Code button in the top-right corner.
Click the Local tab.
Copy the
gh pr checkout XXXcommand in the ‘Checkout with GitHub CLI’.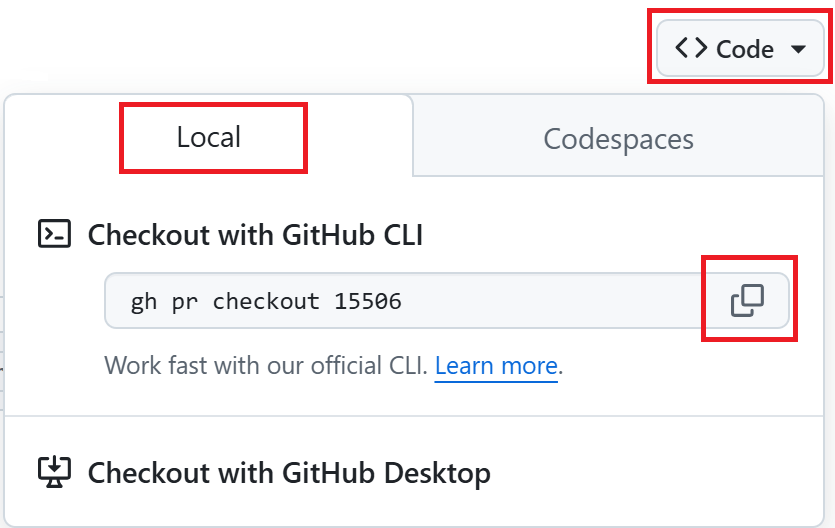
In the terminal, paste the GitHub CLI command and press Enter.
This command pulls the developer’s branch and changes, and applies them to your local Mautic instance. It also clears your cache automatically.
Start testing.
GitHub Codespaces
Refer to the Setting up a testing environment on GitHub Codespaces.
Tip
You can watch the short tutorial about How to test bugs and features in Mautic on YouTube, which explains the easy way to do it.
Testing top tips
Installing sample data
To quickly install sample data, use the command ddev exec bin/console d:f:l to load the Doctrine fixtures. It gives you a big head start with testing.
Build the segments after install
It’s always worth building the segments after installing the sample data using the command ddev exec bin/console m:s:r.
Testing with different databases / PHP versions
In DDEV, you can set the database and PHP version in a file located in the .ddev/config.yaml folder.
If you’re using GitHub Codespaces, set up a codespace from the PR you’re testing and immediately stop the build process as soon as the terminal window displays by pressing
Cmd/Ctrl + Con your keyboard.Run the
ddev delete --omit-snapshot --yes && rm -rf var/cache && rm config/local.phpcommand to clean up the build.Edit the file in
.ddev/config.yamland change the setting - for instance, change DB from MariaDB 10.3 to MySQL 8. Always remember to save the file.mariadb_version: "" mysql_version: "8.0"
Type
ddev startin the terminal to continue with installation.Run the installer in the UI or on the command line, as preferred. All the database credentials are
db. The database host name isddev-mautic-db.Check that you’re using the right version in the system information within Mautic.
If you make a mistake, open your GitHub Codespaces dashboard, delete the codespace, and start again.
Resetting the local testing environment
To quickly reset your local testing environment by deleting the DDEV containers without a database snapshot, removing the cache directory, and removing the local.php file, you can run this command:
ddev delete --omit-snapshot --yes && rm -rf var/cache && rm config/local.php
Leaving a PR review
Within GitHub, there is a built-in system that allows users to leave reviews:
Click the Files changed tab, under the PR title.
Click the green Review changes button in the top-right corner to start a review.
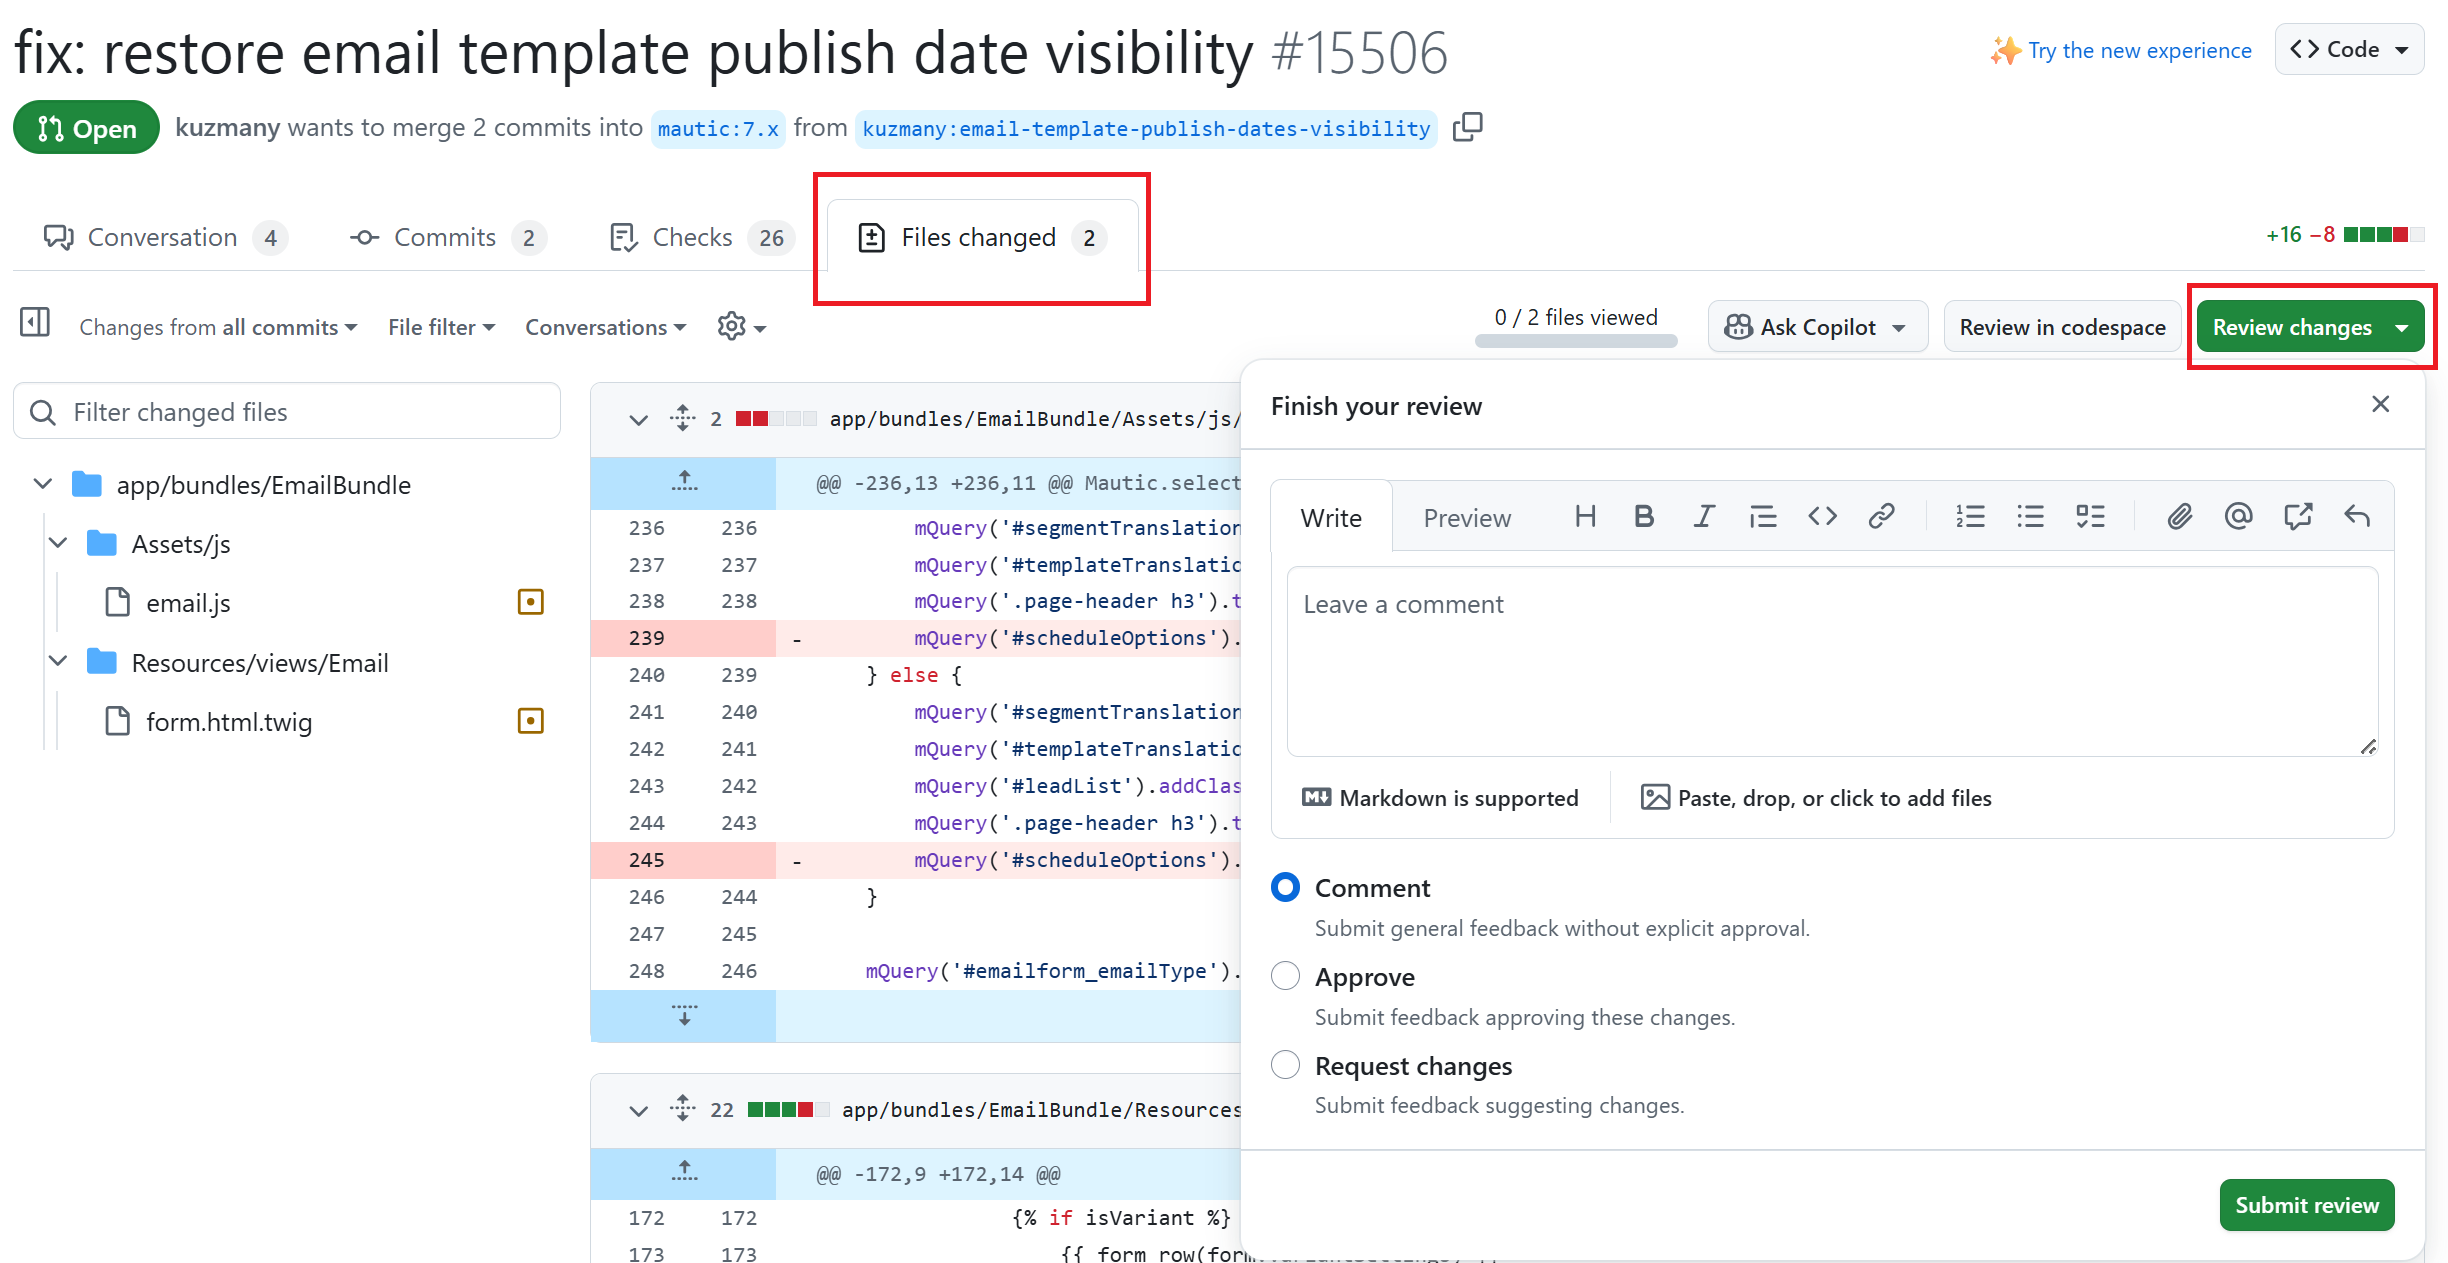
From this point, you can share what you have found when testing the PR. You can select whether you:
approve the PR,
need to ask for some changes, for instance, if you weren’t able to get the results that you expected,
leave a comment if you’re not sure either way,
want to leave some feedback.
Unloading the PR
Once you have finished testing the PR, it’s good practice to revert to the original state. To do this, use the command:
git checkout BASE-BRANCH-NAME
The BASE-BRANCH-NAME is the branch that you want to return to. This command checks you out of the PR to the base branch you started from.
For example:
git checkout 5.2
git checkout 6.0
git checkout 7.x
Now you’re ready to go and find another PR to test. Have a little celebration because you helped make Mautic even more awesome. Thank you for your contribution.